![]()
![]()
![]()
My Miniature Projects
These pages were last updated September 7, 2004
Do It Yourself Tutorial
 Caladium/Elephant Ears
Project
Caladium/Elephant Ears
Project
Supplies:
Silk Leaves (green or variegated colors)
3/4" copper end caps (used in plumbing)
Wire (for stems)
Florist’s Tape (white or light green for wrapping wire to make the stems)
Floral Clay
Fabri-Tac Permanent Adhesive
Aleene’s Tacky Glue or “Woodland Scenic” Scenic Cement Matte Formula (optional)
Used tea leaves or coffee grounds to use for the dirt (dry in a 300 degree oven for one hour. Stir after 30 minutes).
Folk Art Acrylic Paint (#581 Metallic Celadon)
Dr. Ph Martins Iridescent Jade Calligraphy Ink
Tools:
Wire Cutters
Scissors
Small flat brush
Liner brush
Eye Dropper (Optional)
Step 1. Get your “significant other” to take you out to eat at a restaurant that has Elephant Ears growing by the front door so that you can see what they look like. **Grin**
Step 2. Get your “significant other” to go to the hardware store to purchase the copper end caps from the plumbing department for you. **Grin**
Step 3. Cut 7 pieces of wire 4" long. Wrap each wire separately with the florist’s tape. I used the white tape and then painted it with Folk Art Acrylic Paint, #581 Metallic Celadon.
Step 4. See Figure 1 on next page for leaf patterns. Cut out 7 leaves of varying sizes. Run a thin bead of Fabri-Tac Permanent Adhesive starting from the tip of one of the wires for approximately one inch. Lay the wire on the center of the back side of one of the leaves and hold for a few seconds. Repeat for the other six leaves. You should now have 7 leaves with their stems attached.
Step 5. Paint veins in the leaves with Dr. Ph Martins Iridescent Jade Calligraphy Ink using a liner brush.
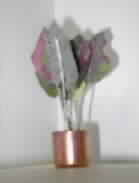
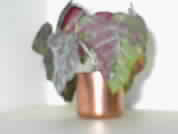
Step 6. Roll a marble sized ball of floral clay and press down firmly inside the copper end cap. Use the end of the paint brush handle to make a hole in the center of the floral clay. Gather the 7 leaves you just made into a bouquet and place them next to the pot to measure how tall you will want your plant to be and trim off the excess stems with wire cutters. Now place the stems in the hole in the floral clay and using the end of the paint brush handle, pack the clay around the stems tightly so they will stand up straight. (See figure 2 below)
Step 7. Fill pot with thoroughly dried used tea leaves and/or coffee grounds. Using the eye dropper, drop Scenic Cement on them. Wait a few minutes until the cement is absorbed and then drop a little more. Let this dry for 24 hours and repeat and let dry for an additional 24 hours. Instead of using the Scenic Cement, you can mix a very thin mixture of Aleene’s Tacky Glue and water, if you so choose.
Step 8. When the glue is completely dry, you can shape your plant. Curve the stems downward over your index finger. The points of the leaves should be pointing straight down. The stems are crooked like the handle of a walking stick. (See figure 3 below - Photo of completed plant).
If there is anything you do not understand, please e-mail me.
|
Figure 2
|
Figure 3
|
||
 Spell
Book Spell
Book |
Leaf
Patterns |
Time
Machine |
|
| Castle |
Professor's
Study |
|
|
| Buttercup |
 |
Newport |
|
 |
|||
|
Graphics Provided by
|
|||