![]()
![]()
![]()
My Miniature Projects
These pages were last updated September 13, 2004
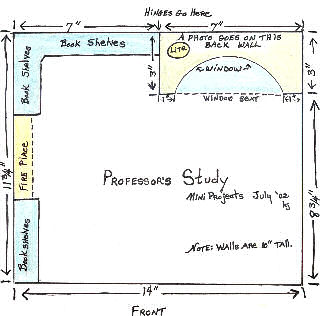
Professor's Study
Step By Step Instructions
|
TOOLS
Small Square Saw to cut wood (If you don’t use wood to build your room box, then you will need a tool to cut the material that you DO choose to use. **Grin** small flat paint brush (for spreading glue evenly) hobby knife pencil drill (optional) to be used to drill holes if you choose to hard wire your room box for lighting
MATERIALS
(2) 2 ft. X 2 ft. X 1/4" thick pieces of oak plywood (the good kind carpenters use for cabinets) Assorted strips of wood for trim Elmer’s Wood Filler Elmer’s Carpenter’s Wood Glue Tester’s Cement for Plastic Models Masking Tape Sand Paper Small Hinges or you can use a strip of needlepoint canvas for the hinge on the back. Cut it 1" X 10" (paint it with thinned glue to stiffen it and keep it from raveling. Wood Sealer Brush for applying sealer 1 empty clear plastic 2 liter or 3 liter soft drink bottle (you will cut out a section of the bottle to make the curved window of the window seat. Small Fireplace (optional)
CUTTING INSTRUCTIONS (NOTE: Walls are 10" tall)
14" X 11 3/4" - Cut 2 - one will be for the floor and one will be for the ceiling 10" X 11 3/4" - Cut 2 - These are the left and right walls 7" X 10" - Cut 2 - This is for the back. NOTE: The 2 pieces of the back will be joined with hinges so that you will have access to installing lighting. The side that can be seen through the window opening will have a landscape picture attached to it with double faced tape so you can change it from time to time, if you so desire at the changes of the seasons. Or if you just feel like a change. 3" X 10" - Cut 1 - This forms the wall to the left side of the window 3/4" X 4 1/4" - Cut 2 - One goes on each side of the window 7" X 3 3/8" - Cut 1 - This is the wood above the window. 2" X 7" - Cut 3 - These are glued together to make the 3 sided box for your window seat. You also have the option of only cutting 2 of these. One for the front of the window seat and one for the seat portion leaving the back open to hide a transformer and your wiring.
|
|
|
 Spell
Book Spell
Book |
Professor's
Study |
Time
Machine |
|
| Castle |
Leaf
Patterns |
|
|
| Buttercup |
 |
Newport |
|
 |
|
||
|
Graphics Provided by
|
|||